Back to: Technology Guides
How to install Wordpress on Ubuntu on a Cloud VPS (Virtual Private Server)
WordPress is a popular content management system (CMS) that makes creating and managing websites easy. It can be used to build anything from simple blogs to complex e-commerce websites.
Today, we are going to combine this incredibly powerful system with a Virtual Private Server (VPS). There are many benefits in using a Virtual Private Server for hosting. To quickly name a few, it provides users with enhanced control, customization, and security compared to shared hosting.
Looking for a VPS hosting solution? Consider Linode for its reliability, scalability, and performance. With flexible features and services, it's perfect for businesses of all sizes.
We assume that you know how to provision a new Ubuntu machine and are starting out fresh.
Ready? Let's get started:
Before we start installing, we need to update our package manager to the latest version.
sudo apt update
sudo apt upgrade
Wait for everything to be done and reboot the machine.
reboot
1. Install Apache
Now that we have the latest packages, we can start by installing the Apache web server.
sudo apt install apache2
After installing, we need to give it some initial configurations so that it will serve our domain and our www subdomain. We set these up beforehand in our DNS:
example.com
www.example.com
We update the default virtual host file located at /etc/apache2/sites-available/000-default.conf to reflect that.
<VirtualHost *:80>

        ServerName example.com
        ServerAlias www.example.com

        ServerAdmin webmaster@localhost
        DocumentRoot /var/www/html

        ErrorLog ${APACHE_LOG_DIR}/error.log
        CustomLog ${APACHE_LOG_DIR}/access.log combined

</VirtualHost>

<Directory "/var/www/html">
        Require all granted
        DirectoryIndex index.php
</Directory>
We use ServerName to define the web address to server and ServerAlias to tell Apache to also server on the www subdomain. Next, we restart the Apache server and we can confirm that the configuration works by visiting out website.
sudo systemctl restart apache2
2. Install PHP
PHP fully powers Wordpress' backend, so let's get that installed as well.
sudo apt install php
We should also consider adding the apache and mysql modules for PHP.
sudo apt install libapache2-mod-php php-mysql
3. Install MySQL (MariaDB)
The last and more important part of the LAMP stack that powers Wordpress is the database. We are going to use MariaDB instead of the traditional MySQL because it offers usability improvements.
sudo apt install mariadb-server
MariaDB comes with a post-installation script that should be ran in order to secure your installation. We should execute it and follow the instructions.
mysql_secure_installation
The first question asks you for the root password in order to secure your installation. But only need to press enter here because root logins via unix_socket by default.
msmtech@wordpress-s-1vcpu-1gb-nyc1-01:~# mysql_secure_installation

NOTE: RUNNING ALL PARTS OF THIS SCRIPT IS RECOMMENDED FOR ALL MariaDB
      SERVERS IN PRODUCTION USE!  PLEASE READ EACH STEP CAREFULLY!

In order to log into MariaDB to secure it, we'll need the current
password for the root user. If you've just installed MariaDB, and
haven't set the root password yet, you should just press enter here.

Enter current password for root (enter for none):
Setting the root password or using the unix_socket ensures that nobody
can log into the MariaDB root user without the proper authorisation.

You already have your root account protected, so you can safely answer 'n'.

Switch to unix_socket authentication [Y/n] n
You already have your root account protected, so you can safely answer 'n'.

Change the root password? [Y/n] n
By default, a MariaDB installation has an anonymous user, allowing anyone
to log into MariaDB without having to have a user account created for
them.  This is intended only for testing, and to make the installation
go a bit smoother.  You should remove them before moving into a
production environment.

Remove anonymous users? [Y/n] y
Normally, root should only be allowed to connect from 'localhost'.  This
ensures that someone cannot guess at the root password from the network.

Disallow root login remotely? [Y/n] y
By default, MariaDB comes with a database named 'test' that anyone can
access.  This is also intended only for testing, and should be removed
before moving into a production environment.

Remove test database and access to it? [Y/n] y
Reloading the privilege tables will ensure that all changes made so far
will take effect immediately.

Reload privilege tables now? [Y/n] y
Now that we have MySQL installed and configured securely, we can create our database for Wordpress and a user for it. Let's get into the MySQL CLI.
sudo mysql
Let's create our database.
CREATE DATABASE wordpress_db;
We can now create our Wordpress database user and grant permissions to it to manage our newly created database.
CREATE USER 'wordpress_user'@'localhost' IDENTIFIED BY 'password';
GRANT ALL PRIVILEGES ON wordpress_db.* TO 'wordpress_user'@'localhost';
FLUSH PRIVILEGES;
We can confirm that our database and user is created:
MariaDB [(none)]> SHOW DATABASES;
+--------------------+
| Database           |
+--------------------+
| information_schema |
| mysql              |
| performance_schema |
| sys                |
| wordpress_db       |
+--------------------+
5 rows in set (0.001 sec)

MariaDB [(none)]> SELECT user, host FROM mysql.user;
+----------------+-----------+
| User           | Host      |
+----------------+-----------+
| mariadb.sys    | localhost |
| mysql          | localhost |
| root           | localhost |
| wordpress_user | localhost |
+----------------+-----------+
4 rows in set (0.003 sec)
4. Install Wordpress
Now that we have our LAMP stack prepared, we can finally install Wordpress. Let's download the latest version of Wordpress.
wget https://wordpress.org/latest.tar.gz
After downloading the latest version of wordpress, we can uncompress it and move it to our web directory.
cd /tmp
wget https://wordpress.org/latest.tar.gz
tar xzvf latest.tar.gz
sudo cp -a /tmp/wordpress/. /var/www/html/
After moving everything into our web directory, we must let the Apache user www-data own it. The Wordpress script will not be able to create and modify files it needs to in order to install if we don't do this.
sudo chown -R www-data:www-data /var/www/html/
sudo find /var/www/html/ -type d -exec chmod 750 {} \;
sudo find /var/www/html/ -type f -exec chmod 640 {} \;
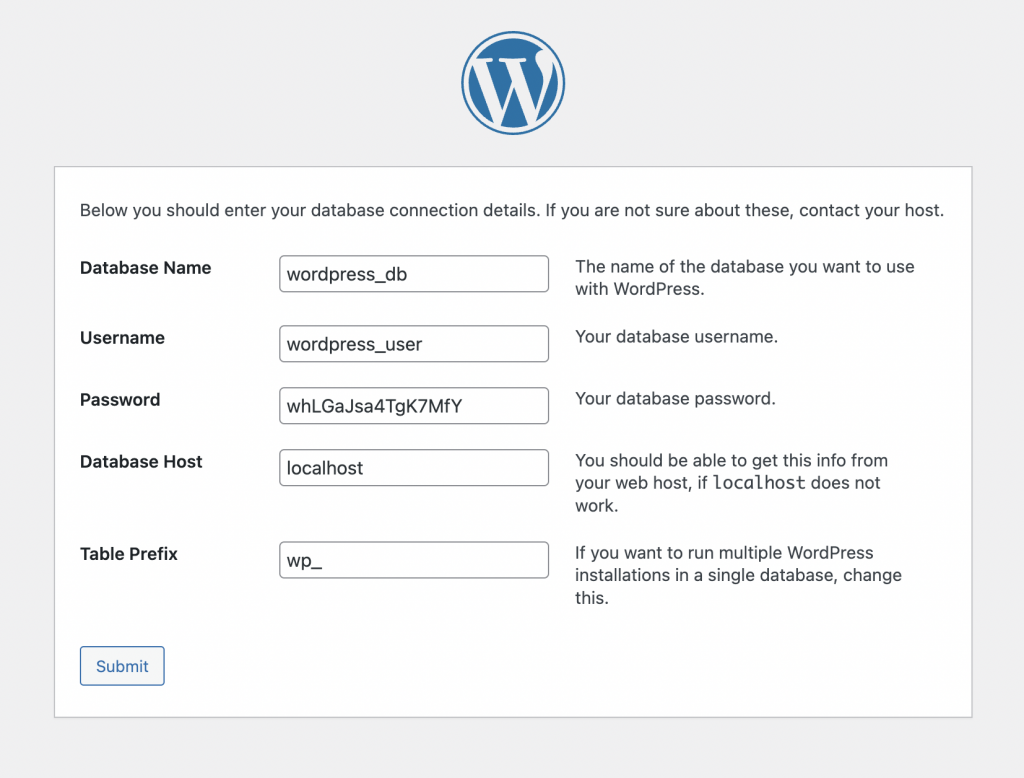
Now we just need to visit our website at example.com and follow the installation steps. Fill in the information for the database and user that we just created.
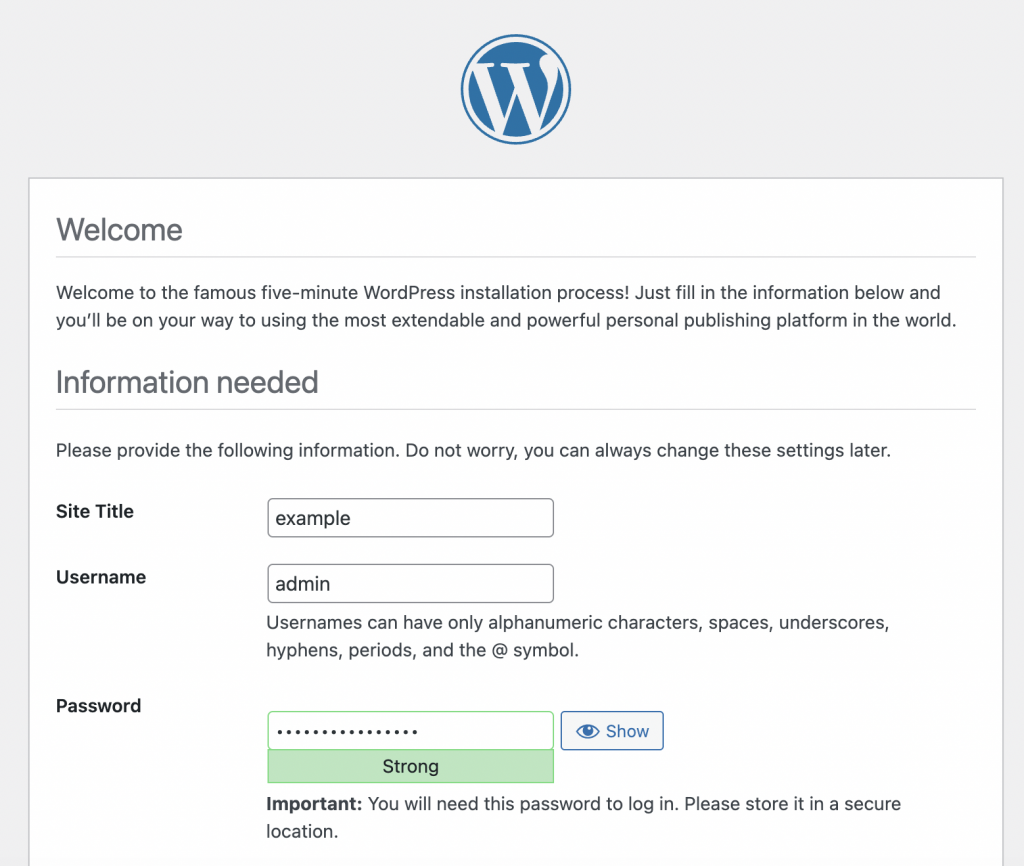
Fill in our Wordpress basic setup information:
Congratulations, we have successfully installed Wordpress from scratch on a VPS.

In conclusion, after provisioning a new Ubuntu server, we have installed Apache, PHP, and MySQL in order to get Wordpress running on it.
For our next steps, we should start configuring the Wordpress installation to suit our needs. We should consider installing an SSL Certificate with Let's Encrypt and Certbot in order to secure our website. We might also want to configure our UFW firewall in order to secure our Ubuntu server.